Quantcast
Channel: GlobalSCAPE Knowledge Base
Viewing all 785 articles
Browse latest View live

TappIn for Android

$
0
0
This article applies to:

TappIn by GlobalSCAPE

TappIn is a network service with supporting software that offers secure, full time access to all your digital content. TappIn provides access from any device — smartphones, Netbooks, remote computers and laptops, using the secure TappIn network and the TappIn Desktop App that resides on your home or work computer. Get started with Tappin for Google Android by following these steps:

  1. Download TappIn for Google Android. Chances are, you have already completed this download step and you have the TappIn application already. If not, simply go to the Android Market and search for TappIn and download the application.
  2. Sign Up for TappIn. There are two ways to become a subscriber of the TappIn Service. You can use the Android app and sign up or go to www.tappin.com and use any Web browser to sign up. TappIn for Android will ask if you wish to sign up the first time you launch the application. You can also connect to the TappIn website from any computer using a Web browser and sign up via the website. First we will show you how to sign up from your Android device:
    1. Sign Up for TappIn using your Android Device. On the TappIn screen, tap “Sign In | Sign Up.”
    2. Tappin Sign In | Sign Up

    3. On the Settings Screen, click the “Sign Up Now” button to navigate to the sign up page.
    4. Tappin Login

    5. Enter your email address. This will become your TappIn username. Then enter a password. NOTE: You must enter a valid email as you will be sent a confirmation. The confirmation will include a link that you must click in order to complete the sign-up process.
  3. Download the TappIn Desktop App. To complete the TappIn installation process, you will need to use your browser to download theTappIn Desktop App to at least one computer. It’s easy! Once you have completed Step 2 above and set up your TappIn account, you will receive an email message with further instructions.
  • Click the link in the email to open the TappIn page on your home or work computer.
  • Follow the instructions.

Congratulations! With TappIn, you can:

  • Share photos from your PC or Mac with your friends and family using your Android device.
  • Stream your iTunes and MP3 libraries to your work computer or mobile device.
  • Collaborate on documents with colleagues.
  • Share photos and other files to Facebook.
  • Enjoy and share all of your digital content from your computer, Android or any other mobile device.


TappIn for Apple iPhone, iPad and iPod Touch

$
0
0
This article applies to:

TappIn by GlobalSCAPE

About TappIn for the Apple iPhone, iPad and iPod Touch: Now you can use your iPhone, iPad or iPod Touch to have full time access to your digital content anytime, anywhere. Whether you want to play your latest video, stream your music, share photos and other documents, we’ll show you how to get started. Here’s what you need to do:

  1. Download TappIn via the iTunes App Store. Chances are, you have already completed this download step and you have the TappIn application already. If not, simply go to the iTunes App Store and search for TappIn and download the TappIn application.
  2. Sign Up for TappIn. There are two ways to become a subscriber of the TappIn service. Your can use the iPhone app or go to www.tappin.com and use any Web browser to sign up. TappIn for iPhone/iPad will ask if you wish to sign up the first time you launch the application. You can also connect to the TappIn website from any computer using a Web browser and sign up via the Website. First we’ll show you how to sign up from your iPhone.
  3. TappIn Login

    1. Sign Up for TappIn from an iPhone/iPad. On the TappIn screen, tap "Sign In | Sign Up."
  • On the Settings screen, click the "Create an account" button to navigate to the sign up page.
  • Enter your email address. This will become your TappIn username. Then enter a password.
  • NOTE: You must enter a valid email as you will be sent a confirmation. The confirmation will include a link that you must click in order to complete the sign-up process.
  • TappIn Apple iOS Sign In

  • Sign Up for TappIn from the Web. You can also create your TappIn account by signing up from the TappIn website at www.tappin.com.
  • TappIn Apple iOS Sign Up

    • On the sign up button, provide your email address.
    • Create a new password and confirm it. (A minimum six-character password is enforced.)
  • Sign In to TappIn. When you are a TappIn subscriber, you are required to sign in for the first time.
    • To sign in, launch the TappIn App by tapping the TappIn button on the home screen.
    • TappIn Apple iOS Sign In

    • First time users will see the following screen. Click the orange "Sign In | Sign Up" button."
    • TappIn Login

    • Enter your email address (this is your TappIn Username) and your password.
    • TappIn Apple iOS Log In

  • Download the TappIn Desktop App. To complete the TappIn installation process, you will need to use your browser to download a small TappIn app to at least one computer. It’s easy! Once you have completed Step 2 above and set up your TappIn account, you will receive an email message with further instructions.
    • Click the link in the email to open the TappIn page on your home or work computer.
    • Follow the instructions.

    This entire process should take a few seconds. Immediately after, you can start enjoying the benefits of TappIn to access and share your digital content anytime, anywhere.

    Congratulations! With TappIn, you can:
    • Share photos from your PC or Mac with your friends and family using your iPhone.
    • Stream your iTunes and MP3 libraries to your work computer or mobile device.
    • Collaborate on documents with colleagues.
    • Share photos and other files to Facebook.
    • With just a tap, enjoy and share all of your digital content from your computer, iPhone, iPad, iPad 2 or any other mobile device.

    How to Use TappIn with the OneDisk iPhone App

    $
    0
    0
    This article applies to:

    TappIn by GlobalSCAPE

    This article outlines how to use the OneDisk iPhone App from Readdle Software and the TappIn remote access and file sharing service. OneDisk is a file management tool that turns any Apple iPhone device into a wireless-accessible storage device. In addition, it can access file servers over the Internet.The value of using OneDisk with TappIn is that you can have simultaneous access to all your digital files and media while connected to other cloud storage or servers on the Internet. Using both solutions in this way provides one app, OneDisk, to provide file management between the home and cloud storage or other servers such as FTP or other WebDAV accessible services.

    Getting Started: TappIn’s remote access and file sharing service offers safe and easy access to all your digital content. Readdle’s OneDisk iPhone app is a universal WebDAV client that can be used to access all your personal content that resides within your home network orcomputers, when configured to work with TappIn services.

    TappIn with OneDisk

    A TappIn account is required prior to setting up and using OneDisk. To register for a TappIn account, go to: www.tappin.com Here is a short checklist on how to setup TappIn:

    1. Launch your Web browser to www.tappin.com.
    2. Register by entering an email address and password.
    3. Click “Sign Up!”
    4. Log into your email account and click the activation link to the TappIn Desktop App.
    5. Install the TappIn Desktop App on at least one computer. By default, your personal directory will be securely accessible over the TappIn network.

    Get the OneDisk App. Purchase OneDisk through the iTunes AppStore and install the app on your device. OneDisk Help is built directly into the app so feel free to reference OneDisk Help along the way to make sure you understand exactly how OneDisk works.

    1. Once installed, launch the application by tapping the OneDisk icon.
    2. TappIn for iPhone with OneDisk

    3. Once OneDisk starts, you will be see the OneDisk home screen. The home screen above displays the list of folders and documents you currently have stored inside the local storage area of the OneDisk app. The Edit button at the top allows you to make changes to the local files and folders. At the bottom of the screen there is a three-tab tab bar, the first which is highlighted above shows all of the files and folders that are local and always accessible. The middle tab is used to access remote servers you may define, and this is where your TappIn remote online folders will reside. Finally, the third tab is used to access the application settings.
    4. TappIn OneDisk Home Screen

    5. When you tap the Online tab you will see the Online Storage screen. This screen displays any remotely accessible servers or services that you can from within OneDisk. Your TappIn shares will show, allowing you to access files and fodlers anywhere, anytime using OneDisk on your mobile device.
    6. TappIn OneDisk Online Storage

    Adding TappIn as a WebDAV Server: In order to access your TappIn shared folders using OneDisk, you need to add the TappIn Service using the "Other WebDAV" server option.

    1. To add the server, click the PLUS button in the upper left of the OneDisk Servers screen.

      TappIn OneDisk Online Storage

      Clicking the + button exposes the list of new server types you can add to make accessible from OneDisk.
    2. When you are at the screen displayed below, you will need to scroll down to the bottom of the list of Services and it should look like this:

      TappIn OneDisk Online Storage

      Once you arrive at the end of the list, you want to tap Other Server to add the Other Server WebDAV service. Once you done, you can proceed to enter the TappIn configuration information.
    3. The following screen will be displayed once you choose Other Server.

      TappIn OneDisk - WebDAV

      1. Enter a descriptive title for this TappIn share, this is what will show up in the main OnLine list of Services.
      2. Enter the URL for the share you want to access. The form of the URL: https://webdav.tappin.com/user@email.com/sharename
      3. Enter your TappIn Username. This is the email address you used when registering for TappIn.
      4. Optional: Enter your password. If you leave it blank, it will prompt you at connection time.
      5. Click Save.

      NOTE: Before you tap Save, you should have a screen that looks like this, but with your specific information in each field.

      TappIn OneDisk - WebDAV Account Edit

    4. OneDisk takes you back to the Online Storage screen where your new TappIn service share is shown in the list of online storage services you can connect.
    5. TappIn OneDisk Online Storage

      Now, if you tap on TappIn while you have an Internet connection, the OneDisk Application will talk across the Internet securely to the TappIn services and will attach to your TappIn shared folder(s).

      TappIn OneDisk - WebDAV Shared Folders

    That’s it. You can now use your favorite WebDAV client OneDisk with your favorite remote access and online file sharing service — TappIn! You can safely upload, download, view and email any files you have stored back in your home/work computer or personal network.

    How to Use TappIn with AirSharing Pro

    $
    0
    0
    This article applies to:

    TappIn by GlobalSCAPE

    Overview: The purpose of this article is to outline how to use the highly popular AirSharing Pro iPhone App from Avatron Software, and TappIn, and also to provide the necessary information required to successfully use AirSharing Pro with TappIn. AirSharing Pro is a very functional file management tool that turns any iPhone device into a wireless-accessible storage device and in addition, it can access file servers over the Internet. The value of using AirSharing Pro with TappIn is that you can have simultaneous access to all your files and media at home, while also connected to other Cloud storage or servers on the Internet. Using both solutions in this way provides one app, AirSharing Pro to provide file management between the Home and Cloud storage or other servers such as FTP, or other WebDAV accessible services such as Apple’s MobileMe storage.

    Getting Started: TappIn enables safe and easy access to all your personal content. Avatron’s AirSharing Pro iPhone app is a universal WebDAV client that can be used to access all your personal content that resides within your home network or computers, when configured to work with TappIn.

    OneDisk with TappIn & AirSharing Communications Diagram

    Setting Up TappIn

    A TappIn account is required prior to setting up and using AirSharing Pro. Here is a short checklist on how to setup TappIn:

    1. Launch your web browser to www.tappin.com.
    2. Click Sign Up.
    3. Provide your valid e-mail address and set a password.
    4. Click Go.
    5. Log into your mail account and click the TappIn Activation link provided in the e-mail.
    6. Install at least one TappIn Agent on one of your home computers. By default you home directory will be securely accessible over the TappIn Network.

    Get the AirSharing Pro App: You can use AppStore on the iPhone or iTunes to purchase AirSharing Pro. Purchase and Install the app on your device. AirSharing Pro has extensive help built into the app itself, so make use of that along the way to make sure you understandexactly how AirSharing Pro works. Once, installed, launch the application by tapping the AirSharing Pro icon:

    AirSharing Device
    • AirSharing Pro will launch and briefly display its splash screen:
    • AirShare Splash Screen
    • Once the splash screen goes away you will be looking at the AirSharing Pro home screen below. This home screen displays the list of folders and documents you currently have stored on your iPhone or iPod touch device. The Edit button at the top allows you to make changes to the local files and folders. The Servers button allows you to add new Cloud or Internet servers to AirSharing Pro so that they may be accessed.
    • AirShare My Documents Screen

    • When you tap the Servers button you will see the Servers screen. This screen displays your local folder storage within AirSharing Pro called "My Documents" which will hold any documents you choose to keep local on the iPhone device itself.
    • AirShare Server

    Adding TappIn as a WebDAV Server: In order to access your TappIn shared folders using AirSharing Pro, you need to add the TappIn Service using the “Other WebDAV” server option.

    1. To add the server click the PLUS button in the upper left of the AirSharing Pro Servers screen:
    2. Icon AirShare Server - Plus Icon

    3. Clicking the Plus button exposes the list of new server types you can add to make accessible from AirSharing Pro. In this case, we want to choose to add the WebDAV server object so we can add the TappIn configuration information:
    4. Add WebDAV server

    5. This screen will be displayed once you choose Other WebDAV:
    6. Other WebDAV

      1. Enter a descriptive name for this TappIn share, this is what will show up in the main list of Servers.
      2. Enter the URL for the share you want to access. The form of the URL: https://webdav.homepipe.net/user@email.com/sharename
      3. Enter your TappIn Username which is the e-mail addressed you are registered with for TappIn.
      4. Optionally enter your password, if you leave it blank it will prompt you at connection time.
      5. Click Save to save this TappIn server.
    7. AirSharing Pro takes you back to the Servers screen where your new TappIn server is shown in the list of servers you can connect to:

      Servers Screen with New HomePipe Server

      Now, if you tap on TappIn while you have an Internet connection, the AirSharing Pro Application will talk across the Internet securely to the TappIn services, and attach to your TappIn shared folder(s):

    8. AirShare HomePipe Folders

    That’s it. You can now use your favorite WebDAV client, AirSharing Pro with your favorite Home Access Service, TappIn!

    TappIn API v1.4

    $
    0
    0
    This article applies to:

    TappIn by GlobalSCAPE

    API v1.4

    Usage Guide for TappIn Partners

    October 2011

    LEGAL NOTICE: This TappIn API Usage Guide ("API Guide") is for the exclusive use of participants in the TappIn Partner Program. If you are not a TappIn Partner, you may not view or otherwise use the contents of this API Guide.


    Terms of Use

    The information contained in this API Guide (the “Contents”) is the proprietary and confidential information of TappIn and mayonly be used by TappIn Partner Program participants (each a “Partner”) who have executed a separate written TappIn Partner ProgramAgreement with TappIn (“Partner Agreement”). If you are not a Partner, you may not view or use this API Guide.

    Each Partner acknowledges the following with respect to its use of this API Guide:

    • The Contents are the confidential and proprietary information of TappIn;
    • Partner’s use of the Contents is subject to the confidentiality and intellectual property ownership provisions of the Partner Agreement, as well as any additional terms and conditions contained in this API Guide;
    • In the event that Partner utilizes the instructions contained in this API Guide to implement a connection with the TappIn Service, Partner will ensure that such use will at all times remain in conformance with the TappIn Service Terms of Use and Privacy Policy (copies of which may be accessed on the TappIn.com website);
    • TappIn provides this API Guide “as is” and Partner’s use of the Contents is without warranty of any kind;
    • This API Guide is subject to change, without prior notice to Partner;
    • The form and nature of the TappIn Service is subject to change, without prior notice to Partner; and
    • Except as expressly specified herein, nothing contained in this API Guide shall be construed as conferring to Partner any license to any of TappIn’s intellectual property rights.

    Contents

    Terms of Use

    Contents

    Introduction

    TappIn High-Level Architecture

    TappIn API

    TappIn Testing and Deployment

    Contact Information


    Introduction

    TappIn Networks is a unique service that allows users access to all of their home content, without artificial limits. This access is provided on a multitude of client platforms (Web browser on Mac/PC/Netbook, iPhone, iPod Touch, iPad, Android Phone, Windows Phone 7) and all popular home computer operating systems (Mac OS X; Windows XP, Vista, 7; Linux).

    The TappIn Agent in the home is intelligent about sending the most appropriate content for the end device. For example, a web browser on a computer can display higher resolution images than a phone and the image is sized appropriately before leaving the home.

    This unique connectivity into the home can be built upon by third-party developers. This can be done in web applications that showcase some of the user’s home content, for example, or in native clients that run on standard or novel platforms. Thepossibilities are endless!

    The TappIn API consists of a WebDAV core augmented with proprietary TappIn Service Interfaces. All interfaces are (RESTful) HTTP interfaces. This document describes them in detail.


    TappIn High-Level Architecture

    The TappIn system consists of three major software pieces:

    1. The TappIn Agents: The TappIn Agent in the home is responsible for transferring data between the home and the TappIn Cloud servers.
    2. The TappIn Cloud Servers: The TappIn Cloud Servers transfer data between the TappIn agents and the TappIn clients. These are the servers that provide the rich TappIn API capabilities.
    3. The TappIn Clients:  The TappIn Clients expose the rich content in the home to the end user. They can be TappIn-provided applications, such as the TappIn web application, the mobiles applications for iPhone, iPod Touch, iPad, Android Phones and Windows Phone 7 phones. They can also be third-party partner clients that use the TappIn API.

    This architecture makes it easy for third-party applications to get data to and from the home without having to worry about how to get at it. All the applications have to do is perform API calls to the TappIn Cloud Servers, just like they would against other services that are purely cloud-based.

    Different TappIn Cloud Servers handle different capabilities, and therefore their URLs are different.

    Back to Contents

    TappIn Secure Communications

    TappIn API

    Folder Enumeration for a TappIn User

    To get the list of the user’s TappIn folders (shares) that are currently online, perform an HTTPS GET to the TappIn Configuration Service:

    https://dav.tappin.com/HomePipe/Configuration/WebDavShares

    (Note: folder enumeration is done by dav.tappin.com)

    The authentication mechanism is Basic Auth within TLS. The username is the email address of the subscriber (e.g. user@tappin.com) and the associated password.

    The response is XML that lists the shares that the user has online at the current time:

    <UserShares xmlns="http://schemas.datacontract.org/2004/07/HomePipe.ConfigurationService"
    xmlns:i="http://www.w3.org/2001/XMLSchema-instance
    ">
    <AgentInstalled>true</AgentInstalled>
    <Shares>
    <UserShare>
    <Name>FriendShare</Name>
    <Owner>false</Owner>
    <ReadWrite>false</ReadWrite>
    <Url>https://dav02.tappin.com/friend@tappin.com/FriendShare/</Url>
    </UserShare>
    <UserShare>
    <Name>ShareName1</Name>
    <Owner>true</Owner>
    <ReadWrite>true</ReadWrite>
    <Url>https://dav03.tappin.com/friend@tappin.com/FriendShare/</Url>
    </UserShare>
    <UserShare>
    <Name>ShareName2</Name>
    <Owner>true</Owner>
    <ReadWrite>false</ReadWrite>
    <Url>https://dav01.tappin.com/user@tappin.com/ShareName2/</Url>
    </UserShare>
    </Shares>
    </UserShares>

    For each share (TappIn folder), the following information is provided:

    1. Name: The name of the share
    2. Owner: Whether the user requesting the enumeration is the owner of the share, or whether it’s been shared by a friend.
    3. ReadWrite: Whether the share is a read/write share (true) or a read-only share (false).
    4. Url: The HTTPS URL to use to access the share.
    Back to Contents

    WebDAV Browsing

    Once the list of shares is obtained (see above), standard WebDAV methods (e.g. PROPFIND, GET, PUT etc.) can be used against the shares.

    The authentication mechanism is again Basic Auth within TLS, using the end user’s credentials. The base URL for the WebDAV share is obtained from the User Share Listing call and is of the form:

    https://webdav.tappin.com/user@tappin.com/ShareName2/

    (Note: WebDAV browsing is done by webdav.tappin.com)

    This share maps to a directory on the user’s computer (e.g. C:\Users\Joe\Documents). Therefore, to access the file C:\Users\Joe\Documents\Sales\Winter.xls, a GET:

    GET https://webdav.tappin.com/user@tappin.com/ShareName2/Sales/Winter.xls

    returns the content of the file. To obtain the directory listing of the Sales folder, a PROPFIND:

    PROPFIND https://webdav.tappin.com/user@tappin.com/ShareName2/Sales

    returns the directory listing in standard DAV XML.

    Back to Contents

    Below are illustrative examples of invoking commonly used WebDAV methods. Any standard HTTPS client can be used to make these requests:

    PROPFIND

    PROPFIND /user@tappin.com/DILATINO/folder/HTTP/1.1Content-Type:text/xml;charset="utf-8"Depth: 1Content-Length: 98Host:webdav.tappin.comAuthorization:Basic cHJldmlld0Bob21lcGlwZS5uZXQ6dGVzdHBhc3N3b3Jk
    <?xml version="1.0" encoding="utf-8"?><DAV:propfind xmlns:DAV="DAV:"><DAV:allprop/></DAV:propfind>
    HTTP/1.1 207 Multi-StatusContent-Length: 2920Content-Type:text/xml
    <?xml version="1.0" encoding="utf-8"?><D:multistatus xmlns:D="DAV:"><D:response><D:href>http://webdav.tappin.com/preview@tappin.com/DILATINO/folder/</D:href><D:propstat><D:status>HTTP/1.1 200 OK</D:status><D:prop><D:getcontentlength>0</D:getcontentlength><D:getlastmodified>Fri, 29 Oct 2010 18:36:21 GMT</D:getlastmodified><D:creationdate>2010-10-29T18:06:07Z</D:creationdate><D:ishidden>0</D:ishidden><D:resourcetype><D:collection /></D:resourcetype><D:displayname>folder</D:displayname><D:supportedlock /><D:iscollection>1</D:iscollection><D:getcontenttype>httpd/unix-directory</D:getcontenttype></D:prop></D:propstat></D:response><D:response><D:href>http://webdav.tappin.com/preview@tappin.com/DILATINO/folder/newfolder/</D:href><D:propstat><D:status>HTTP/1.1200 OK</D:status><D:prop><D:getcontentlength>0</D:getcontentlength><D:getlastmodified>Fri, 29 Oct 2010 18:31:41 GMT</D:getlastmodified><D:creationdate>2010-10-29T18:31:41Z</D:creationdate><D:ishidden>0</D:ishidden><D:resourcetype><D:collection /></D:resourcetype><D:displayname>newfolder</D:displayname><D:supportedlock /><D:iscollection>1</D:iscollection><D:getcontenttype>httpd/unix-directory</D:getcontenttype></D:prop></D:propstat></D:response><D:response><D:href>http://webdav.tappin.com/preview@tappin.com/DILATINO/folder/subfolder/</D:href><D:propstat><D:status>HTTP/1.1 200 OK</D:status><D:prop><D:getcontentlength>0</D:getcontentlength><D:getlastmodified>Fri, 29 Oct 2010 18:34:46 GMT</D:getlastmodified><D:creationdate>2010-10-29T18:34:46Z</D:creationdate><D:ishidden>0</D:ishidden><D:resourcetype><D:collection /></D:resourcetype><D:displayname>subfolder</D:displayname><D:supportedlock /><D:iscollection>1</D:iscollection><D:getcontenttype>httpd/unix-directory</D:getcontenttype></D:prop></D:propstat></D:response><D:response><D:href>http://webdav.tappin.com/preview@tappin.com/DILATINO/folder/report.doc</D:href><D:propstat><D:status>HTTP/1.1 200 OK</D:status><D:prop><D:getcontentlength>21617</D:getcontentlength><D:getlastmodified>Fri, 29 Oct 2010 18:35:44 GMT</D:getlastmodified><D:creationdate>2010-10-29T18:35:44Z</D:creationdate><D:resourcetype /><D:displayname>report.doc</D:displayname><D:supportedlock /><D:ishidden>0</D:ishidden><D:iscollection>0</D:iscollection><D:getcontenttype>application/octet-stream</D:getcontenttype></D:prop></D:propstat></D:response><D:response><D:href>http://webdav.tappin.com/preview@tappin.com/DILATINO/folder/sales.xls</D:href><D:propstat><D:status>HTTP/1.1 200 OK</D:status><D:prop><D:getcontentlength>12874</D:getcontentlength><D:getlastmodified>Fri, 29 Oct 2010 18:36:22 GMT</D:getlastmodified><D:creationdate>2010-10-29T18:36:21Z</D:creationdate><D:resourcetype /><D:displayname>sales.xls</D:displayname><D:supportedlock /><D:ishidden>0</D:ishidden><D:iscollection>0</D:iscollection><D:getcontenttype>application/octet-stream</D:getcontenttype></D:prop></D:propstat></D:response></D:multistatus>
    Back to Contents

    PUT

    PUT /user@tappin.com/DILATINO/folder/test.txt HTTP/1.1Content-Length: 16Host: webdav.tappin.comAuthorization: Basic cHJldmlld0Bob21lcGlwZS5uZXQ6dGVzdHBhc3N3b3JkThis is a test.HTTP/1.1 200 OK

    GET

    GET /user@tappin.com/DILATINO/folder/test.txt HTTP/1.1Host: webdav.tappin.comAuthorization: Basic cHJldmlld0Bob21lcGlwZS5uZXQ6dGVzdHBhc3N3b3JkHTTP/1.1 200 OKContent-Length: 16This is a test.

    DELETE

    DELETE /user@tappin.com/DILATINO/filename.txt HTTP/1.1Host: webdav.tappin.comAuthorization: Basic cHJldmlld0Bob21lcGlwZS5uZXQ6dGVzdHBhc3N3b3JkHTTP/1.1 200 OK

    MKCOL

    MKCOL /user@tappin.com/DILATINO/folder/newfolder HTTP/1.1Host: webdav.tappin.comAuthorization: Basic cHJldmlld0Bob21lcGlwZS5uZXQ6dGVzdHBhc3N3b3JkHTTP/1.1 200 OK

    MOVE

    MOVE /user@tappin.com/DILATINO/folder/newfolder/&ens;HTTP/1.1Destination:&ens;http://webdav.tappin.com/preview@tappin.com/DILATINO/folder/anothernameHost: webdav.tappin.comAuthorization: Basic cHJldmlld0Bob21lcGlwZS5uZXQ6dGVzdHBhc3N3b3JkHTTP/1.1 200 OK
    Back to Contents

    Query string decorations for GETs

    A standard GET for a file simply returns the entire contents of the file, as expected in WebDAV. There are a number of TappIn extensions that allows for variants of the file contents to be served up instead.

    ?thumbnailSize=<width>x<height>

    If the file is an image file (e.g. jpg, png), a thumbnail of that image is generated and returned. The size of the thumbnail is specified; e.g. 64x64. For thumbnails of size 128x128 or smaller, a low resolution thumbnail is returned. For large “thumbnails”, a resized version of the original (still much smaller in KiloByte size) is returned, which provides for much higher fidelity but is somewhat slower.

    ?thumbnailSize=<width>x<height>&keepAR=true

    To preserve the aspect ratio (AR) of an image intact, use the keepAR flag. For example, for a 2000x1500 high-resolution photo, asking for a 400x400 thumbnail with keepAR true returns a 400x300 scaled-down version of the original.

    ?download=true

    For the purpose of instructing a browser to download a file instead of attempting to display it, use the download decoration. This sets the Content-Disposition header appropriately for download.

    ?mrss=true

    This decoration applies only to GETs of directories. A normal GET would be invalid, however, with this query string, a Media-RSS description of the pictures in the directory is returned. This XML description contains links to both thumbnail and medium-resolution versions of the pictures in the directory.

    Back to Contents


    New User Registration

    This API is used by partners of TappIn who are referring users to TappIn. These users can be registered as new TappIn users with this API call. The users will have to click on a link sent to their email address, to activate their TappIn account.

    The registration API is a POST to the TLS URL:

    https://app.tappin.com/HomePipe/SignUp/SignUp

    (Note: user registration is done by app.tappin.com)

    The request is XML of the form:

    <?xml version="1.0" encoding="utf-8"?>
    <SignUpInformation xmlns:xsi="http://www.w3.org/2001/XMLSchema-instance"
    xmlns:xsd="http://www.w3.org/2001/XMLSchema">
    <FirstName>Test First Name</FirstName>
    <LastName>Test Last Name</LastName>
    <Email>Test Email</Email>
    <Password>Test Password</Password>
    </SignUpInformation>

    The response is the status of the registration. It is XML of the form:

    <?xml version="1.0" encoding="utf-8"?>
    <SignUpStatus xmlns:xsi="http://www.w3.org/2001/XMLSchema-instance"
    xmlns:xsd="http://www.w3.org/2001/XMLSchema">
    <ErrorCode>0</ErrorCode>
    <ErrorString>RegistrationSuccessful</ErrorString>
    </SignUpStatus>

    The possible status codes are:

    // The registration was successful.RegistrationSuccessful = 0,
    // The registration failed for some unknown reason.// This is abnormal and indicates a server error.// Handle as gracefully as possible on the client.RegistrationFailed = 1,
    // The user (as defined by the email address) already exists.// Tell the user to simply log in with their original credentials.UserAlreadyExists = 2,
    // The user (as defined by the email address) does not exist yet.// It's safe to use this email address for// completing the sign up process.UserDoesNotExistYet = 3,
    // The email address provided by the user is invalid.// Reprompt the user for a new email address.InvalidEmailAddress = 4

    You will need to be in the TappIn partnership program to be able to use this API. Please contact TappIn for the credentials to use to authenticate this request.

    Back to Contents

    User Exists

    This API call is also used by partners of TappIn. The purpose of this call is to let the client validate user input on the fly, before a formal registration request is made. It simply checks whether the email address sent is already known. The URL is:

    https://app.tappin.com/HomePipe/SignUp/UserExists

    (Note: user check is done by app.tappin.com)

    The format of the XML request and th XML response are the same as for the registration API.

    You will need to be in the TappIn partnership program to be able to use this API. Please contact TappIn for the credentials to use to authenticate this request.


    User Subscription Information

    This API call lets the client obtain information about the user’s subscription, such as the number of uses left for the month. The URL is:

    https://dav.tappin.com/HomePipe/Subscription/GetSubscriptionInfo?userAgent={userAgent}

    where {userAgent} is the (URL-encoded) user agent string for the client (used for tracking purposes). This URL is protected by Basic Auth, as usual, with the user’s credentials.

    The response is of the form:

    <?xml version="1.0" encoding="utf-8"?>
    <SubscriptionInfo xmlns:xsi="http://www.w3.org/2001/XMLSchema-instance"
    xmlns:xsd="http://www.w3.org/2001/XMLSchema">
    <ShouldUpgrade>false</ShouldUpgrade>
    <UpgradeURL>http://www.tappin.com</UpgradeURL>
    <IsPayingSubscriber>false</IsPayingSubscriber>
    <SubscriptionExpiryDate>2011-02-04T01:02:14.2312498Z</SubscriptionExpiryDate>
    <DaysRemaining>30</DaysRemaining>
    <UsageStatistics>
    <TotalFreeUsesPerMonth>10</TotalFreeUsesPerMonth>
    <CurrentMonthUseCount>2</CurrentMonthUseCount></UsageStatistics>
    <HasPremiumApp>true</HasPremiumApp>
    </SubscriptionInfo>

    The “ShouldUpgrade” and “UpdateURL” are used by TappIn clients to determine whether an upgrade is necessary. It should be ignored by partners.

    The “IsPayingSubscriber” boolean field indicates whether the user is a paying subscriber of TappIn.

    The “SubscriptionExpiryDate” indicates when the paid subscription ends.

    The “DaysRemaining” is the number of full days till the subscription expires.

    The “TotalFreeUsesPerMonth” is the maximum number of free uses a user is allowed per month. The “CurrentMonthUseCount” is the number of free uses the user has already used up this current month. Thus, the number of free uses the user has left for the month is:

    Number_Of_Uses_Left_In_Current_Month=TotalFreeUsesPerMonth&#emps;CurrentMonthUseCount
    TappIn defines a “use” of the service as follows:
    A "Use" of the TappIn Service is started when a TappIn user accesses (views/downloads) his or her files. A period of inactivity of two or more hours ends the "Use" of TappIn. Any future file access counts as the next "Use."

    The “HasPremiumApp” boolean field signals whether the user has ever purchased a paid version of a TappIn app.

    TappIn still lets users access their friends’ shared content even when their free usage has expired. They just cannot access their own content.

    Back to Contents

    User Recent Picture Listing

    This set of API calls is for playful and social interaction with users.

    Recent Pictures

    This API call returns 3 picture URLs in order of most recent: first from friends, then from user if there weren’t 3 found, then from the default set if the previous two searches don’t add up to 3.

    Perform an HTTPS GET to:

    https://app.tappin.com/HomePipe/RecentPictures

    The authentication mechanism is Basic Auth within TLS. The username is the email address of the subscriber (e.g. user@tappin.com) and the associated password.

    The response is XML of this form:

    <?xml version="1.0" encoding="utf-8"?>
    <RecentPictures xmlns:xsi="http://www.w3.org/2001/XMLSchema-instance"
    xmlns:xsd="http://www.w3.org/2001/XMLSchema">
    <Picture>
    <Name>Chrysanthemum</Name>
    <Url>https://dav03.tappin.com/kevin.beddingfield@gmail.com/Pictures/Chrysanthemum.jpg</Url>
    </Picture>
    <Picture>
    <Name>Desert</Name>
    <Url>https://dav03.tappin.com/kevin.beddingfield@gmail.com/
    Pictures/Desert.jpg
    </Url>
    </Picture>
    <Picture>
    <Name>Hydrangeas</Name>
    <Url>https://dav03.tappin.com/kevin.beddingfield@gmail.com/
    Pictures/Hydrangeas.jpg
    </Url>
    </Picture>
    </RecentPictures>

    My Recent Pictures

    This API call returns 3 picture URLs in order of most recent: first from user, then from the default set if the user didn’t have 3.

    Perform an HTTPS GET to:

    https://app.tappin.com/HomePipe/MyRecentPictures

    The authentication mechanism is Basic Auth within TLS. The username is the email address of the subscriber (e.g. user@tappin.com ) and the associated password.

    The response is XML of the same form as the Recent Pictures API call.

    Friends Recent Pictures

    This API call returns 3 picture URLs in order of most recent: first from friends, then from the default set if the friends didn’t have 3. Perform an HTTPS GET to:

    https://app.tappin.com/HomePipe/FriendsRecentPictures

    The authentication mechanism is Basic Auth within TLS. The username is the email address of the subscriber (e.g. user@tappin.com) and the associated password.

    The response is XML of the same form as the Recent Pictures API call.

    Back to Contents

    Sharing

    This API call lets the client initiate sharing of a user’s file or folder via a public or private link as well as send sharing notification. Private sharing requires a list of emails (TappIn usernames) that will have rights to access the share. Email notifications will be sent automatically in this case. For public sharing a link should be shared via other means (e.g. by the user composing an email themselves, or by SMS etc). Share Read-Only or Read-Write access will be the same as defined for the share and is not changed by the sharing API.

    A POST to the following URL initiates sharing:

    https://app.tappin.com/HomePipe/Sharing/Share/

    This URL is protected by Basic Auth, as usual, with the user’s credentials.

    The request is of the form:

    <?xml version="1.0" encoding="utf-8"?>
    <sharing_information xmlns:xsi=\"http://www.w3.org/2001/XMLSchema-
    instance\" xmlns:xsd=\"http://www.w3.org/2001/XMLSchema\">
    <sharename>$sharename</sharename>
    <path>$path</path>
    <needlogin>$needlogin</needlogin>
    <people>$people</people>
    <message>$message</message>
    <body>$body</body>
    <from$from</from>
    <type>$type</type>
    <intent>$intent</intent>
    <needshort>$needshort&lr;/needshort>
    </sharing_information>

    The parameters are as following:

    “$sharename” is a name for share.

    “$path” is the share’s mount point: this is a relative path, relative to the path that was defined when the user created the “$sharename” share.

    “$needlogin” is yes for private and no for public sharing.

    “$people” is comma (“,”) separated list of email addresses. These emails need not all be TappIn users: if they are not, they will be invited to become users before they are allowed to view the shared content.

    “$message” is a subject of notification email.

    “$body” is a body of notification email.

    “$from” is a user email (username of the account).

    “$type” is a ‘file’ for single file sharing or ‘folder’ for a folder sharing.

    “$intent” is an intent of sharing that can be one of the following: “undefined”, “sms”, (“homepipe” (this is used for sharing on TappIn web site), “facebook”, “email”, “link” (generic link sharing).

    “$needshort” is a ‘yes’ or ‘no’ for getting a short (using TappIn URL-shortening service) or default long sharing link.

    Example:

    <?xml version="1.0" encoding="utf-8"?>sharing_informationxmlns:xsi="http://www.w3.org/2001/XMLSchema-instance"xmlns:xsd="http://www.w3.org/2001/XMLSchema"><sharename>C</sharename> <path>Music/</path><needlogin>no</needlogin> <people>noemails</people><message></message> <body></body><from>tester@homepipe.net</from> <type>folder</type><intent>email</intent><needshort>no</needshort></sharing_information>

    The response is of the form (example):

    <?xml version="1.0" encoding="utf-8"?><SignUpStatus xmlns:xsi="http://www.w3.org/2001/XMLSchema-instance"xmlns:xsd="http://www.w3.org/2001/XMLSchema"><ErrorCode>0</ErrorCode><ErrorString>OK</ErrorString><SharedLink>https://app.tappin.com/access/0aaaaaa0-aaaa-1111-bbbb-111111111111</SharedLink><ShortLink>tppn.in/12345678</ShortLink><DavPrefix>https://dav05.tappin.com/tester@homepipe.net/</DavPrefix></SignUpStatus>

    The “ErrorCode” indicates the error code (0 is no error)

    The “ErrorString” describes an error.

    The “SharedLink” is a resulting shared link.

    The “DavPrefix” is information about the server that can be used for accessing tumbnails if needed.

    If private sharing was used TappIn server will send notifications to all parties in the people list (if not empty).

    Back to Contents

    TappIn Testing and Deployment

    In most cases, you will use stable versions of the TappIn API currently running on production servers. However, in some instances, close partners may take a dependency on a pre-release API. This section explains the TappIn testing and production deployment process.

    TappIn uses a staged approach to testing and rolling out to production. The first step after internal development is to host beta-quality code on the TappIn Staging servers, with their own dedicated user account database:

    1. TappIn Web Staging Server: https://www-staging.tappin.com. Use this everywhere instead of https://app.tappin.com.
    2. TappIn Dav Server: https://dav-staging.tappin.com. Use this everywhere instead of https://dav.tappin.com and https://webdav.tappin.com.

    If you need access to the staging servers, please contact TappIn.


    Contact Information

    Please contact us at: support@tappin.com for admission into the TappIn API program and other inquiries and questions.

    Thanks for using the TappIn APIs!

    Back to Contents

    How do I set up a home folder for AD authenticated users using something other than the default option?

    $
    0
    0

    THE INFORMATION IN THIS ARTICLE APPLIES TO:

    • Secure FTP Server (All Versions)
    • EFT Server (All Versions)

    QUESTION

    How do I set a home folder for AD authenticated users that is something other than the default /user/%username% option that EFT Server provides?

    ANSWER

    Refer to the online help topic for details:

    GlobalSCAPE EFT Server failed to create folder monitor rules. Error: 80070003

    $
    0
    0

    THE INFORMATION IN THIS ARTICLE APPLIES TO:

    • EFT Server, all versions

    SYMPTOM

    I have a Folder Monitoring rule that will perform an Action when a file is added. I’m getting an error in the Application Event Log each time I enable the Event Rule (e.g., GlobalSCAPE EFT Server failed to create folder monitor rules. Error: 80070003).

    RESOLUTION

    The most likely cause of this error is that the drive is a mapped drive. In this case, you would need to use the actual UNC path to which the mapped drive is pointing. The EFT Server service itself is not part of your interactive Windows environment, so it is not aware of any mapped drives.

    Points to remember when creating Folder Monitor rules include:

    • To monitor a folder on a network share, supply the full UNC path to the network share. (The format for a UNC path is \\server\share\path\to\directory and is not case-sensitive. For example: \\FileServer2\Share3\WGroups\Network).
    • If the EFT Server service is running under the default “Local System” account, it will not be able to access remote drives. The EFT Server service must be running under an account that has sufficient access to the share and to the files and folders under the share. That is, make sure that the EFT Server Service has sufficient privileges to perform READ operations on the remote share. If you are using the "health check" feature, it must also have WRITE permissions. It is generally recommended tht you set the EFT Server service to run as a domain account or specify an appropriate “run as” account.
    • When monitoring a folder, EFT Server watches for any file being added to, removed from, or renamed in the monitored folder. Moving a file, performing PGP operations, and other actions can trigger the Rule again, resulting in failures. This can be avoided by selecting the Stop processing this rule check box after if action failed then.

    For more information about Folder Monitor Event Rules, refer to Monitoring Folders in the EFT Server online help.

    How much storage space does the ARM database require?

    $
    0
    0

    THE INFORMATION IN THIS ARTICLE APPLIES TO:

    • EFT Server (All Versions)
    QUESTION

    How much storage space does the ARM database require?

    ANSWER

    Database capacity planning can be very simple or very complex depending on the needs and size of the organization. Space requirements for transactions depend on estimated EFT Server activity, number of users, installed modules, number of Event Rules defined/enabled, and many other factors.

    3GB minimum hard drive space is recommended for the initial database size.

    Space requirements for transactions depend on estimated EFT Server activity, number of users, installed modules, Event Rules, and so on. A general estimate is 3MB to 5 MB per 1000 files uploaded.

    A good database maintenance plan is important to keeping space requirements to a minimum (aging/archiving/warehousing/truncating old data).

    For better database performance, follow the standard SQL/Oracle tuning guidelines in their user documentation.

    If you are using SQL Server 2008 Developer and Enterprise editions for your EFT Server database, refer to the MSDN article Creating Compressed Tables and Indexes.

    Also refer to the following GlobalSCAPE Knowledge Base articles:

    MORE INFORMATION

    We used the following procedure to determine the general estimate of 3 MB to 5MB per 1000 files uploaded:

    1. Executed the built-in stored procedure sp_spaceused and recorded the initial database size. (The “reserved” column indicates how much data is in the database.)

    2. Ran 20000 file uploads via scripted CuteFTP.

    3. Executed the built-in stored procedure sp_spaceused and recorded the final database size.

    4. Subtracted the initial size from the final size and divided the result by the number of transactions.


    What is the difference between "basic auth" and "form-based auth"?

    $
    0
    0

    THE INFORMATION IN THIS ARTICLE APPLIES TO:

    • EFT Server, version 6.0 and later

    QUESTION

    What is the difference between "basic authentication" and "form-based authentication"?

    ANSWER

    Basic authentication, or “basic auth” is formally defined in the Hypertext Transfer Protocol standard, RFC 1954. When a client (your browser) connects to a web server, it sends a “WWW-Authenticate: Basic” message in the HTTP header. Shortly after that, it sends your login credentials to the server using a mild obfuscation technique called base64 encoding. When HTTPS is used, these credentials are protected, so it’s not considered insecure, which is why basic auth gained widespread use over the years. The biggest problem with basic auth has to do with the logging off the server, as most browsers tend to cache sessions and have inconsistently dealt with the need to properly close and clear connection states (or sessions) so that another (different) user couldn’t log back in by refreshing the browser.

    Form-based authentication is not formalized by any RFC. In essence, it is a programmatic method of authentication that developers create to mitigate the downside of basic auth. Most implementations of form-based authentication share the following characteristics:

    1) They don’t use the formal HTTP authentication techniques (basic or digest).

    2) They use the standard HTML form fields to pass the username and password values to the server.

    3) The server validates the credentials and then creates a “session” that is tied to a unique key that is passed between the client and server on each http put and get request.

    4) When the user clicks “log off” or the server logs the user off (for example after certain idle time), the server will invalidate the session key, which makes any subsequent communication between the client and server require re-validation (resubmission of login credentials via the form) in order to establish a new session key.

    As with basic auth, form-based auth does not protect login credentials when connected over HTTP, therefore it is not more “secure” than basic auth in how it handles user credentials. It is however more secure when it comes to properly logging the user off after a certain period of inactivity or if the user no longer requires use of the system and decides to log out.

    For details of basic auth and form-based auth in EFT Server, refer to End-User Log In to EFT Server.

    EFT Server E-mail Messages

    $
    0
    0

    THE INFORMATION IN THIS ARTICLE APPLIES TO:

    • EFT Server Enterprise version 6.2 and later

    DISCUSSION

    EFT Server generates several different types of e-mail messages during operation. Some messages can be edited within the administration interface, while others must be edited within a text file that you create. The various e-mails and their uses are described below. (Note that each e-mail is also described in the user guide. Click the links below for more information.)

    To allow e-mails to be sent from the Advanced Workflow Engine, you must define a registry value so that the AWE knows which SMTP server to use. Please refer to Could not send “On Error” email for AWE action; default mail server not defined for details.

    E-Mail Description Where Edited
    Audit failure notification e-mail Sent when database connection errors occur System message; not editable
    Password reset reminder message Notify users of their pending password expiration up to 30 days prior to the password expiration date--applies to all users on the Server Administration interface, Server node > General tab
    Password reset required message Notify users that their password has expired--applies to all users on the Server Administration interface, Server node > General tab
    User login credentials message E-mail that contains the login credentials for connecting to EFT Server--applies to all users on the Server Administration interface, Server node > General tab
    Connection Banner Message When a client first connects to the Site via FTP, but before the user logs on, the connection banner appears. Administration interface, Site > Connections tab > FTP/S Config > FTP Settings dialog box
    User Limit Reached Message Message that appears to the user when the maximum simultaneous connections limit is exceeded Administration interface, Site > Connections tab > FTP/S Config > FTP Settings dialog box
    Quit Session Messages Message that appears when the client closes the session gracefully by using the FTP QUIT command. Administration interface, Site > Connections tab > FTP/S Config > FTP Settings dialog box
    E-mail Notification Message E-mail sent with the Send Mail Action when an Event Rule is triggered. Administration interface, Server node > Event Rules node > Event Rule
    AD password expiration e-mail Notify users when that their password is about to expire Windows Registry to enable, then create the file PasswordChg_PwdWillExpire.txt and save it in the \web\public\EFTClient subdirectory
    WTC change AD password error Current password is entered incorrectly Create the file PasswordChg_PasswordWrong.txt and save it in the \web\public\EFTClient subdirectory
    Network connection error Create the file PasswordChg_NetworkProblem.txt and save it in the \web\public\EFTClient subdirectory
    User does not have permission from AD to change the password Create the file PasswordChg_Permission.txt and save in the \web\public\EFTClient subdirectory
    New password does not meet the AD complexity requirements Create the file PasswordChg_PasswordComplexity.txt and save it in the \web\public\EFTClient subdirectory

    How do I Configure an Event Rule to Copy/Move a File that is Triggered on a Folder Monitor Event with a Renamed Condition?

    $
    0
    0

    THE INFORMATION IN THIS ARTICLE APPLIES TO:

    • EFT Server (All Versions)

    QUESTION

    How can I configure an Event Rule to copy/move a file that is triggered on a Folder Monitor event with a Renamed condition?

    ANSWER

    Use the variable %FS.DST_PATH% instead of %FS.PATH%, and %FS.DST_FILE_NAME% instead of %FS.FILE_NAME%.

    If the file is renamed, the new name context is lost to FS.PATH and FS.FILE_NAME, which still retain the old path/name, while the new path/name is passed to %FS.DST_PATH% and %FS.DST_FILE_NAME%.

    EXAMPLE

    Desired logic:

    Monitor Folder()   if File Change = Renamed Then            Move renamed file to xyz location
    Suppose the monitored folder contained a file called Robert.txt and I rename the file Bob.txt:
    %FS.DST_FILE_NAME%
    contains the new value Bob.txt, while
    %FS.FILE_NAME% 
    contains the old value Robert.txt.

    If you want to move the modified (renamed) file, use the "DST"-based context variables as shown below, as those contain the modified values.

    For version-specific information, refer to the applicable user guide:

    v6

    v6.1

    v6.2

    v6.3

    v6.4

    How can I configure EFT Server’s outbound copy/move Event Rule action to route traffic through DMZ Gateway Server?

    $
    0
    0

    THE INFORMATION IN THIS ARTICLE APPLIES TO:

    • EFT Server (All Versions)

    QUESTION

    How can I configure EFT Server’s outbound copy/move Event Rule action to route traffic through DMZ Gateway server?

    ANSWER

    EFT Server’s DMZ Gateway server is designed to handle inbound traffic only. Outbound connections that originate from EFT Server route through normal network mechanisms to reach the destination; however, it is possible to set up EFT Server’s outbound copy/move action set using a proxy server residing in the DMZ for outbound connections.

    For details, refer to the online help topics:

    Is EFT Server's AS2 module Drummond certified?

    $
    0
    0

    THE INFORMATION IN THIS ARTICLE APPLIES TO:

    • EFT Server (versions 5.2.3 and later)

    QUESTION

    Is EFT Server's AS2 module Drummond certified?

    ANSWER

    Yes. The AS2 component used in EFT Server is /n software's IP*Works EDI v8.3 Engine, in compliance with RFC4130. (The Drummond Group requires you to register your email address on their web site linked above to see their Current Certified Product List.)

    In March 2008, GlobalSCAPE announced that EFT Server supports both client (outbound) and server (inbound) AS2 transfers with a Drummond-certified AS2 adapter that has achieved interoperability with other Drummond-certified AS2 servers and clients. The full product's first release was in July 2008 with EFT Server version 5.2.3.

    For more information, refer to the EFT Server online help documentation:

    Can the AWE tasks upload a file using SSL over FTP?

    $
    0
    0

    THE INFORMATION IN THIS ARTICLE APPLIES TO:

    • EFT Server version 6.3 and later

    QUESTION

    Can the AWE tasks upload a file using SSL over FTP?

    ANSWER

    Yes. In AWE's FTP action, you can specify FTPS in the Advanced Properties under Connection type. Please refer to FTP Action in the Advanced Workflow Engine online help for more information.

    Move event failing

    $
    0
    0

    THE INFORMATION IN THIS ARTICLE APPLIES TO:

    • EFT Server

    SYMPTOM

    Move event fails to move files.

    RESOLUTION

    You can configure an Event Rule triggered by a Folder Monitor event to copy or move files in the folder and save them with a different name.

    Refer to the followng topics for details of defining an Event Rule using the Copy/Move file to host Action:

    IMPORTANT: If you want to move a modified (renamed) file, use the DST-based variables (e.g., %FS.DST_FILE_NAME%) because they contain the modified values.

    For example, when you configure an Event Rule to copy/move a file that is triggered on a Monitor Folder event with a Condition of If file change does equal to rename, use the following variables:

    • %FS.DST_PATH% instead of %FS.PATH%
    • %FS.DST_FILE_NAME% instead of %FS.FILE_NAME%.

    If the file is renamed, the new name context is lost to FS.PATH and FS.FILE_NAME, which retain the old path/name, but the new path/name is passed to %FS.DST_PATH% and %FS.DST_FILE_NAME%.

    For example, suppose the monitored folder contained a file called Robert.txt and you rename the file Bob.txt.

    %FS.DST_FILE_NAME% contains the new value Bob.txt, but %FS.FILE_NAME% contains the old value Robert.txt.


    Using OpenSSL to Generate/Convert Keys and Certificates

    $
    0
    0

    THE INFORMATION IN THIS ARTICLE APPLIES TO:

    • Secure FTP Server (FIPS)
    • EFT Server

    QUESTION

    How can I generate and convert keys and certificates?

    ANSWER

    Secure FTP Server's and EFT Server's Certificate Creation wizard guides you through the process of creating keys and certificates without using a command line. If you prefer to use a command line tool, the OpenSSL command-line tool can be used to generate and convert private keys and public certificates, including:

    • Creation of RSA, DH, and DSA key parameters

    • Creation of X.509 certificates, CSRs, and CRLs

    • Calculation of Message Digests

    • Encryption and Decryption with Ciphers

    • SSL/TLS Client and Server Tests

    • Handling of S/MIME signed or encrypted mail

    You can download the precompiled Windows binary and Windows Installer for OpenSSL from http://www.slproweb.com/products/Win32OpenSSL.html. The OpenSSL distribution contains a number of utilities, including the main utility openssl.exe. By default, the utilities are installed in C:\Openssl\bin. openssl.exe and associated utilities are used at a Windows command prompt.

    Some commands require specification of the OpenSSL configuration file openssl.cnf. By default, this file is installed in C:\Openssl\bin. Therefore, when required, you would use the path C:\Openssl\bin\openssl.cnf to specify the configuration filename.

    You can run the commands from any location by specifying the full path to the desired executable or by changing to the bin directory and using only the executable filenames.

    For example:

    >cd c:\temp

    >c:\Openssl\bin\openssl

    Or:

    >cd c:\Openssl\bin

    >openssl.exe

    Using OpenSSL to Generate and Convert Private Keys and Public Certificates

    Refer to the procedures below for using OpenSSL to generate or convert private keys and public certificates.

    Use this procedure if you want to generate a public certificate and unencrypted key by hand instead of generating one from within the Server.

    Use this procedure if you want to generate a public certificate and encrypted key by hand instead of generating one from within the Server.

    Use this procedure if you want to generate a compatible PFX/P12 file (often confused with PFX) containing a public certificate and key.

    Use this procedure when a you already have a public certificate and PEM encoded PKCS#8 format encrypted private key file. You can determine the format by viewing the private key file in a text editor. If it contains the following line, then this procedure most likely applies:

    -----BEGIN ENCRYPTED PRIVATE KEY-----

    Use this procedure when a you already have a public certificate and traditional PEM encoded encrypted private key file. You can determine the format by viewing the private key file in a text editor. If it contains the following line, then this procedure most likely applies:

    -----BEGIN RSA PRIVATE KEY-----Proc-Type: 4,ENCRYPTED

    Use this procedure when you want to convert an existing incompatible PKCS#12 format encrypted private key/public certificate file to a compatible PKCS#12 format file.

    Use this procedure when you want to convert an existing incompatible PKCS#12 format encrypted private key/public certificate file to a compatible PKCS#12 format file.

    Use this procedure when you want to convert an EFT Server certificate to PFX format file.

    Can I convert an EFT Server certificate to PFX format?

    $
    0
    0

    THE INFORMATION IN THIS ARTICLE APPLIES TO:

    • EFT Server, version 6.0 and later

    QUESTION

    Can I convert an EFT Server certificate to PFX format?

    ANSWER

    In the EFT Server administration interface, you can create an SSL Certificate with a PFX-format Private Key. However, if you want to convert an existing non-PFX certificate to PFX format, you can do so in OpenSSL using the procedure below.

    1. Download the windows OpenSSL command line utility:
    2. Win32 OpenSSL v1.0.0f Light > http://www.slproweb.com/download/Win32OpenSSL_Light-1_0_0f.exe

      If you have issues installing or running it, check the site http://www.slproweb.com/products/Win32OpenSSL.html. There are various C++ libraries that may be necessary.

    3. Verify operation by executing <install dir>OpenSSL\Bin\openssl.exe at a command prompt:
    4. Copy your private key (*.key) and certificate (*.crt) to the /Bin directory. 
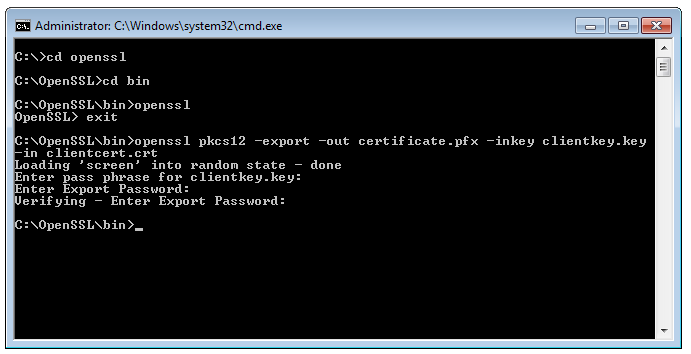
    5. Execute the following command to combine the .KEY and CRT files into a PFX:
    6. openssl pkcs12 -export -out certificate.pfx -inkey clientkey.key -in clientcert.crt

    7. When prompted, provide the passphrase for your KEY file and also a new passphrase for the new PFX file.

    Refer to Knowledge Base article Q10401 - HOWTO:Using OpenSSL to Generate/Convert Keys and Certificates for moreinformation regarding using the OpenSSL command-line tool to generateand convert private keys and public certificates.

    Can I automatically ban an IP address that has tried to log in incorrectly multiple times?

    $
    0
    0
    THE INFORMATION IN THIS ARTICLE APPLIES TO:
    • EFT Server versions 5.x and earlier
    • Secure FTP Server (All Versions)

    NOTE: You do not need to follow this procedure if you are using EFT Server versions 6 or later; you can configure autoban settings in the GUI. Refer to:

    QUESTION

    Is there any way of auto-banning an IP address that has tried to log in incorrectly multiple times?

    ANSWER

    There are several methods that you can use to temporarily or permanently disallow unauthorized or problem users from accessing the Server. This article describes how to ban the IP address of users attempting to connect with a non-existing login name. (For other methods, refer to the links at the bottom of this article.)

    Note: Editing and running .vbs scripts are for advanced users. If you need assistance with editing scripts, contact GlobalSCAPE's Professional Services team for assistance.

    **You only need to configure this once; you can schedule Event Rules to run the script automatically at regularly scheduled intervals, as described below.**

    To create the command and the script that it will execute:

    1. Download the attached script file, addbanip.vbs (or addbanip.txt and rename it with thhe .vbs extension), and save it in c:\temp.
    2. Copy the following text into a text editor (e.g., Notepad/EditPlus) and save it as batch file in c:\temp. For example, c:\temp\LogInvalidIp.bat.
    3. @echo off

      rem Simply append all arguments to the log file

      rem "%EVENT.TIME%" "%USER.LOGIN%" "%CONNECTION.REMOTE_IP%" "%EVENT.REASON%"

      %CONNECTION.LOCAL_PORT%" "%CONNECTION.PROTOCOL%"

      Echo %1 %2 %3 %4 %5 %6 %7 %8 %9 >>InvalidIp.txt

      The batch file will create a file named InvalidIp.txt whenever there is a failed connection attempt on the Server.

    4. Add a custom command on the Server. Provide any name and description, and the path to the executable (in this example, c:\temp\LogInvalidIp.bat.) Clear the Output check boxes. Do not enter ANYTHING on the Advanced or Permissions tabs.
    5. Create a User Login Failed Event Rule, and add the Execute command in folder Action. (Refer to Using an Event Rule to Execute a Command for details, if necessary.)
    6. Click in the Action to display the Custom Command dialog box.
      1. In the Select command box, click the down arrow and select your new command.
      2. Copy and paste the following variables into the Specify command parameters box (be sure to include the percent signs and quotation marks):
      3. "%EVENT.TIME%" "%USER.LOGIN%" "%CONNECTION.REMOTE_IP%" "%EVENT.REASON%" "%CONNECTION.LOCAL_PORT%" "%CONNECTION.PROTOCOL%"

      4. In the Specify command working folder box, type or click the folder icon and browse to the folder where the executable resides (c:\temp). (Note: No error checking is done to verify that you have typed a valid path.)
      5. Click OK to save the Command, then click Apply to save the rule.
    7. Open the script file that you downloaded, addbanip.vbs, and edit the variables under Constants for server details to reflect your configuration. (Because this plain-text file will contain your username/password pair, be sure to save the file in a secure location.):
    • IP address(cServer)
    • Site name (cServerSite)
    • Port, (cPort)
    • Username (cUserName)
    • Password (cPassword)
    • Log (cLogFile) file path (For this example, "c:\temp\InvalidIp.txt")
    • Temp work (cWorkFile) file path (For this example, "c:\temp\InvalidIp.wrk")
    • Your IP address to keep you from locking yourself out (cIgnoreIP)
    • E-mail variables to e-mail you when an authorized login occurs (You can comment out the calls to the e-mail subroutines to prevent the e-mails from being sent while testing.)
    • And most importantly, set the maximum number of invalid login attempts before an IP is added to the ban list (MaxInvalidLogins). Do not set this too low, because if a legitimate user "fat fingers" the login, they will be banned.

    To test it:

    1. Use CuteFTP or another client to attempt to log in to the Server using a non-existant username. Repeat multiple times, until you have exceeded MaxInvalidLogins.
    2. The failed login should cause the file InvalidIp.txt to be created in c:\temp. If it is, continue. If not, troubleshoot the above steps. The contents of InvalidIp.txt should look similar to the following text (including the quotation marks):
    3. "24 Jan 08 15:14:41" "wwwww" "127.0.0.1" "Invalid password" "21" "FTP"

    4. At a command prompt, execute addbanip.vbs.
    5. Click OK through the prompts, carefully noting each one.
    6. When the prompt "Add n.n.n.n to denied IPs - click OK" appears, click OK, and the IP addresses should be added to the deny list. If you do not get that far, then most likely no IP addresses matched the criteria. You can add Print lines all through the code as necessary (e.g. Print "now checking blah blah blah") to help you debug/diagnose the script.
    7. If the script works and the IP is added to the ban list, you are set to go. You can manually run the script when necessary or setup Windows Scheduler to run the script automatically. When the script is run, it will parse InvalidIp.txt for any failed login attempts and if there are multiple failures for the same IP address (more than MaxInvalidLogins), the IP address will be banned.

    For more information about blocking/disconnecting problem/unauthorized connections to EFT Server, refer to the following topics in the online help file. (Similar procedures are available for Secure FTP Server.)

    • Block anti-timeout schemes. Many FTP clients send random commands such as REST 0, PWD, TYPE A, LIST, etc., to the FTP server to keep the session alive while the client is idle. (Set at the Site level)
    • Configure EFT Server to automatically ban IP addresses that may potentially be associated with a DoS (Denial of Service) attack. The Flooding and Denial of Service Prevention settings can block DoS attacks in which the same IP address unsuccessfully tries repeatedly (numerous times per second) to access the Server.
    • Use the IP access restrictions list to block specific IP addresses or allow only specific IP addresses.
    • Temporarily or permanently disable user accounts after a defined number of invalid password attempts over a specified time. (Set at the User or User Setting Level only)
    • Disconnect users and optionally ban their IP address after a defined number of invalid commands. Many FTP clients send a NOOP command to the Server during idle times to keep the connection alive. If you disallow the NOOP command, it will be considered an invalid command and treated according to your settings under Disconnect after <n> invalid commands. (Set at the User or User Setting Level only)
    • Automatically disconnect users after a specified time of inactivity, set per user or at the User Setting Level, by setting a maximum idle time limit. Set at the User or User Setting Level only)
    • Temporarily or permanently disable idle user accounts (i.e., accounts that have not accessed the Server in a defined period of time.
    • Forcibly log a user off the Server. (Performed at the Server Level)
    • Disable a User Setting Level or user account or set an expiration date on a user account. Expired/disabled accounts are not removed from the Server; they can be re-enabled at any time.
    • Disconnect users after a defined number of invalid commands, but only if the username is valid and the password is bad. (If the username does not exist, it cannot be banned.)
    • Disconnect users after a specified time of inactivity

    Configuring CuteFTP Pro to Run as a Service on Windows Server 2003

    $
    0
    0

    THE INFORMATION IN THIS ARTICLE APPLIES TO:

    • CuteFTP 8 Professional running on Windows Server 2003

    CONFIGURING CUTEFTP PRO TO RUN AS A SERVICE ON WINDOWS 2003 SERVER

    This article guides you through the steps of setting up CuteFTP Pro on a Windows 2003 Server computer such that CuteFTP Pro runs as a service. Doing so will enable scheduled jobs (such as folder synchronization) to be completed even without a user logging into that computer.

    The configuration requires the use of utilities available in Microsoft Windows Server 2003 Resource Kit Tools.

    This article assumes CuteFTP 8 Professional is already installed and activated.

    This article is provided as a convenience to our customers. Although the steps shown have been tested, configuration in this manner is not officially supported by the GlobalSCAPE Technical Support team.

    INSTALLING MICROSOFT WINDOWS SERVER 2003 RESOURCE KIT TOOLS

    1. Browse to the Microsoft Windows Server 2003 Resource Kit Tools download page and follow the onscreen instructions to download rktools.exe.
    2. To install the Resource Kit tools, run rktools.exe. By default, the resource kit files are extracted to %Program Files%\Windows Resource Kits\Tools\.
    3. For these purposes, there are only two components of the Resource Kit that are needed. They are the Service Installer (instsrv.exe) and the Applications as Services Utility (srvany.exe). After the installation is finished, open %Program Files%\Windows Resource Kits\Tools\ and confirm those files exist.

    CONFIGURING CUTEFTP PRO AS A SERVICE

    CuteFTP Professional consists of two components; the Transfer Engine or TE (ftpte.exe) and the CuteFTP user interface or GUI (cuteftppro.exe). To be successful, both components must be configured to run as services with the TE service loading first.

    Caution: The following steps involve editing the Windows registry on the server computer. Incorrectly editing the registry may severely damage your system. These instructions are intended for the advanced user who is prepared to both edit and restore the registry. We recommend that you backup the registry before proceeding.

    1. Open a command prompt. (On the Start menu click Run, type cmd.exe and then click OK.)
    2. To create the service for the TE, type the following at the command prompt: [reskitpath]\instsrv.exe “GlobalSCAPE CuteFTP PRO TE” [reskitpath]\srvany.exe (Where [reskitpath] is the path to the Windows Resource Kit folder. By default the path to the Resource Kit folder is C:\Program Files\Windows Resource Kits\Tools\.)
    3. To create the service for the GUI, type the following at the command prompt: [reskitpath]\instsrv.exe “GlobalSCAPE CuteFTP APP” [reskitpath]\srvany.exe
    4. Start Registry Editor (On the Start menu click Run, type regedit and then click OK.) and navigate to the following subkey:
    5. HKEY_LOCAL_MACHINE\SYSTEM\CurrentControlSet\Services\GlobalSCAPE CuteFTP PRO TE\

    • Verify that the value for the entry named ImagePath is set to point to srvany.exe (If this is not set correctly, the service will stop shortly after it starts and return an Event ID 7000 "The service name failed to start.")
    • Select the GlobalSCAPE CuteFTP PRO TE subkey and then on the Edit menu click New then click Key.
    • Create a new subkey named Parameters. If you are prompted for a class, leave it blank.
    • Select the newly created Parameters subkey and then on the Edit menu click New and then click String Value.
    • For the entry name, type Application. For the data type, select REG_SZ.
    • For the string value, type the full path to the CuteFTP Pro TE (ftpte.exe). By default the full path is C:\Program Files\GlobalSCAPE\CuteFTP 8 Professional\ftpte.exe
  • Navigate to the following subkey:
  • HKEY_LOCAL_MACHINE\SYSTEM\CurrentControlSet\Services\GlobalSCAPE CuteFTP APP\

    • Verify that the value for the entry named ImagePath is set to point to srvany.exe (If this is not set correctly, the service will stop shortly after it starts and return an Event ID 7000 "The service name failed to start.")
    • Select the GlobalSCAPE CuteFTP APP subkey and then on the Edit menu click New then click Key.
    • Create a new subkey named Parameters. If you are prompted for a class, leave it blank.
    • Select the newly created Parameters subkey and then on the Edit menu click New and then click String Value.
    • For the entry name, type Application. For the data type, select REG_SZ.
    • For the string value, type the full path to the CuteFTP Pro GUI (cuteftppro.exe). By default the full path is C:\Program Files\GlobalSCAPE\CuteFTP 8 Professional\cuteftppro.exe
  • Navigate to the following subkey:
  • HKEY_LOCAL_MACHINE\SYSTEM\CurrentControlSet\Control\ServiceGroupOrder.

    • Double-click on the list entry and add a new value in the list named GlobalSCAPE_TE. Immediately below that, create a second new value named GlobalSCAPE_CuteFTP_APP. It is important that GlobalSCAPE_CuteFTP_APP is listed after GlobalSCAPE_TE in the list. Place the new values into the list at the point in the startup sequence where you want the CuteFTP services to start. (For example, to configure it so that the CuteFTP services start after all other services, place the two new values at the end of the list.)
    • Click OK to close the editing screen.
  • Navigate to the following subkey:
  • HKEY_LOCAL_MACHINE\SYSTEM\CurrentControlSet\Services\GlobalSCAPE CuteFTP PRO TE

    • Right-click on the name of the subkey, click New and then click String Value.
    • For the name, type Group. Double-click to modify the newly created Group entry and type GlobalSCAPE_TE for the value associated with the transfer engine.
    • Click OK to close the editing screen.
  • Navigate to the following subkey:
  • HKEY_LOCAL_MACHINE\SYSTEM\CurrentControlSet\Services\GlobalSCAPE CuteFTP APP

    • Right-click on the name of the subkey, click New and then click String Value.
    • For the name, type Group. Double-click to modify the newly created Group entry and type GlobalSCAPE_CuteFTP_APP for the value associated with the CuteFTP GUI.
    • Click OK to close the editing screen.
  • Close Registry Editor.
  • In Control Panel, double-click Administrative Tools and then double-click Services.
  • Follow the steps shown for both the GlobalSCAPE CuteFTP Pro TE service and the GlobalSCAPE CuteFTP APP service.
    • Double-click the service named GlobalSCAPE CuteFTP Pro TE to access the service properties.
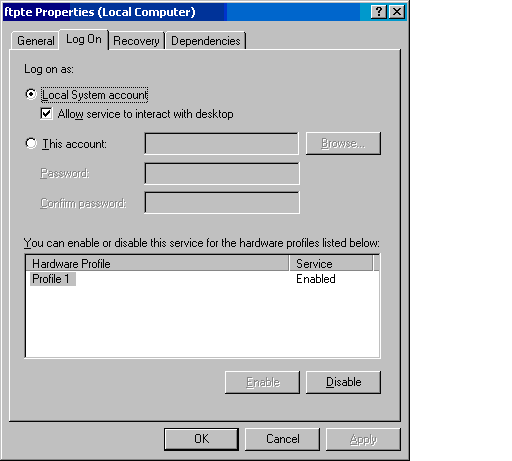
    • On the Log On tab, select the Allow Service to Interact with Desktop check box and then click OK.
    • Repeat the two steps above for the service named GlobalSCAPE CuteFTP APP.
  • Restart the computer.
  • By default, the newly created services are configured to run automatically when the system is started; To start the CuteFTP Pro services manually, click Start Service for both GlobalSCAPE CuteFTP Pro TE service and the GlobalSCAPE CuteFTP APP service.
  • Additional Considerations

    1. It is important to note that CuteFTP Pro makes use of the user profile area to store important information such as trusted SSL certificates and SSH server keys, as well as site manager data, log files, and so on. The user profile area is typically a per-user path on the computer such as C:\Documents and Settings\<username>. Data is stored in the following subfolder of the user profile: Application Data\GlobalSCAPE\CuteFTP Pro\8.0
    2. Because CuteFTP Pro is now running as a service, it will use the user profile area with the username LocalService. You can change the user account under which the CuteFTP Pro services run in the Services Administration Utility; however, be sure that you also:

    • Update the Access Control Lists (ACL) on the required files for the CuteFTP Pro services (read permissions on the installation folder).
    • Migrate any required files from the prior user profile, for example if you have already trusted a server SSH key then be sure to copy the Security folder to the new profile.
  • After starting the CuteFTP Pro services, perform the following operations:
    • Connect to any security-enabled site (FTP over SSH, or FTP over SSL) and ACCEPT the SSH Key or SSL Certificate. You need to do this once for each security-enabled site to which you connect so that the subsequent connections do not block on waiting for the acceptance of the certificate or key.
    • For each of your selected sites, ensure that uploads and downloads both work as expected. Performing a simple transfer test interactively will help to avoid hidden or complex errors that might occur in unattended mode.
    • In the CuteFTP Pro GUI, on the Tools menu click Global Options. Expand Transfer and click Smart Overwrite. Configure the desired prompt timeout action and delay time so that in the event of an overwrite prompt during unattended operation, your desired action is carried out automatically.
    • Finally, set up your Folder Monitor (or similar) rule for the unattended job(s). Connect to the remote server and then on the Tools menu click Folder Tools and then either Monitor Local Folders (if you wish to periodically upload local files to the remote side), or Synchronize Folders (if you wish to both upload and download).
  • If you restart the computer running this new service such that a specified scheduled task interval is missed (for example, the computer goes down on a Friday and is not restarted until Monday, therefore missing two nightly jobs), the service will likely show the following screen. Note that the default action of Execute all is sufficient and the timeout (shown as a number in parentheses counting down to 0) will take place so that the net result is resuming the proper operation of the service. This is not an error; it is documented here to avoid confusion over this issue.
  • Note: If you receive "Error code 80080005 -- server execution failed." see the Microsoft knowledge base article #870655 at http://support.microsoft.com/kb/870655.

    Legacy Directory Listings

    $
    0
    0

    THE INFORMATION IN THIS ARTICLE APPLIES TO:

    • EFT Server version 6.2.18 and later

    DISCUSSION

    Before version 6.2, EFT Server did not request folder and file permissions information during a directory listing. Newer implementations capture the folder and file permissions during the directory listing. If a UNC folder contains a large number of files (e.g., 40,000), the additional overhead required for the permissions messages can increase the time required to get and display the directory listing.

    • If the permissions information is captured during the directory listing, EFT Server can better control the user's access as they traverse folders (current implementation).
    • If the permissions information is not captured during the directory listing, when a user attempts operations for which they do not have sufficient privileges, the user will receive error messages much later (legacy implementation).

    To change the way directory listings are handled, create the DWORD LegacyDirListBehavior at the following location and set it to any non-zero value.

    32-bit:

    HKEY_LOCAL_MACHINE\SOFTWARE\GlobalSCAPE Inc.\EFT Server 4.0\

    62-bit:

    HKEY_LOCAL_MACHINE\SOFTWARE\Wow6432Node\GlobalSCAPE Inc.\EFT Server 4.0\

    Viewing all 785 articles
    Browse latest View live